Wireless remote control and panorama setup for Sony NEX-7

Markus already wrote two articles about controlling the NEX-5 with a wireless remote control. The first article presented the code and the schematics. In the second article he wrote about the final ‘product’, a boxed version of his Arduino.

Inspired by his design I tried to reduce the size. Therefore I didn’t implement the infrared receiver part and I also used a Arduino Nano instead of a regular Arduino. And I also used a smaller radio receiver. I finally had these components.

Radio transmitter, opened controller-box, trigger

The next image shows a detailed view of the guts inside the box. With all the connecting cables and the two circuit boards there is not much space left.

Arduino Nano, radio receiver, cables

The next images are showing the final setup. The trigger is attached to the camera. The controler box is connected to the trigger. The radio transmitter is ready to fire.

Sony NEX-7 with attached trigger, controller box, radio transmitter

The following image shows a detail of the mounted trigger on the Sony NEX-7. I used some florist wire to attach the circuit board to the connector of the hand strap. On the other side the circuit board is glued to an hotshoe adapter which connects to the hotshoe of the camera.

Sony NEX-7 with attached trigger (detail)

And finally some images of the complete panorama setup, including a custom made lens bracket (in fact it’s a simple pipe clamp from the hardware store), a Novoflex Alpha- to E-Mount adapter and a Sigma 8mm/4.0 fisheye. For panoramic photography this setup is used on top of a double-monopod construction.

The weigtht of the shown setup is 1145 g (2 lb 8 oz). My old setup (Sony Alpha 900 with shaved Sigma 10mm/2.8) has 1710 g (3 lb 12 oz). In both cases this includes camera, lens, adapter, bracket, trigger, controller box, batteries and memory card.

Both setups delivers equirectangulars with the same size (10.000 x 5.000) and with both setups I shoot 4 around and mostly no up and no down shot.

Complete setup (back view)
Complete setup (right view)
Complete setup (front view)
Complete setup (left view, wake up)
Complete setup (left view, trigger)

And here is the new setup in action.

Shooting a horizontal pole panorama

Click here to view some panoramic images which were taken with this setup.

24h Snowing and Raining (timelapse video)

I was searching for a first project I wanted to shoot with my new gadget. The remote trigger for the Sony NEX 5 I presented in the previous post. I decided to shoot a timelapse video. As I did not have my time lapse trigger with me but a laptop I applied some changes to the code and the time lapse function for the Ultimate Trigger was born.

I programmed a fixed interval of 10 minutes between each shot, set the camera to aperture priority mode, set the focus to manual and started shooting for 24 hours. Every now and then I checked the progress and had some minor problems:

  1. After the first two hours the servo had moved and did not trigger any more.
  2. After the first six hours the Ultimate Trigger battery has been drained, however I noticed this after about the time, when more than four hours of shots were missing.
  3. After half the shooting time the Sony NEX battery was about half empty. As I did not have a spare one with me I recharged it several times for 9 minute intervals between the 10 minute shooting intervals.

Apart from these minor flaws I am satisfied with the result you can see here:

24h Snowing and Raining

24 hours of snow and rain captured using a Sony NEX 5 and the Ultimate Trigger.

Remote Trigger with Arduino, a Shield in a Box

After the prototype remote trigger I presented in my previous post has been tested succesfully I decided to make my own shield for the arduino and put the whole system in a box, that I could take with me for shooting panoramas. What you see in the following pictures is my attempt to make a portable system for all types of remote triggering my NEX 5. I called this project The Ultimate Trigger V1.

Creative Commons License The Ultimate Trigger V1 is licensed under a Creative Commons Attribution-ShareAlike 3.0 Unported License.

I tried to make the shield somehow modular in design. This means I can attach different types of servos, I can attach a different IR receiver and I can change the attached wireless RF receiver without using a soldering iron.

This image shows the guts of the whole system. On the left side from top to bottom:
The arduino board with the attached shield. Several items are connected via cables to the shield: The IR remote receiver with its red-black-blue cable going to the upper lid of the box on the right. The IR receiver itself is glued to the lid with instant adhesive. The servo can be connected via the red-black-green cable going towards the outside of the lid. The third party wireless RF remote receiver (dismantled compared to my last post) sits in the bottom right part of the left lid and is attached to the shild also via a cable. Last but not least you see the 9V battery powering the arduino and the shield. The wireless RF receiver has its own battery.

Ultimate Trigger V1 - Box Open

When the box is closed you see on the upper side (which is in my definition the side next to the camera and thus close to the servo) the three pins, where a servo can be attached. Furthermore you see on the side facing the operator the three LEDs showing the status of the device.

Ultimate Trigger V1 - Box Top

On the bottom side you see from left to right: The IR receiver, the arduino USB port and the arduino power port.

Ultimate Trigger V1 - Box Bottom

Like the image before this one shows the bottom part of the box (from left to right): The IR receiver, the arduino USB port and the arduino power port.

Ultimate Trigger V1 - Box Bottom Details

The following images show the system without the box. First the shield connected to the arduino. The battery, servo, RF receiver and IR receiver are all disconnected.

Ultimate Trigger V1 - Shield On Arduino

This image shows the top view of the plain shield.

Ultimate Trigger V1 - Shield Top

This image shows the bottom view of the plain shield.

Ultimate Trigger V1 - Shield Bottom

Remote Trigger with Arduino


Warning: WP_Syntax::substituteToken(): Argument #1 ($match) must be passed by reference, value given in /home/pacs/mma00/users/panotwins/doms/panotwins.de/subs/wp/wp-content/plugins/wp-syntax/wp-syntax.php on line 380

One problem with the Sony NEX 5 camara series is the lack of a decent remote shutter mode. You are able to switch it to IR mode and use the IR remote control to take a picture. However you can’t combine any of the other available trigger modes like bracketing or high speed trigger with the IR remote control. I wanted to change this and started this project described here: The ultimate remote trigger for the Sony NEX 5 using a servo and an arduino board. I called this project The Ultimate Trigger V1.

Creative Commons License The Ultimate Trigger V1 is licensed under a Creative Commons Attribution-ShareAlike 3.0 Unported License.

The remote control has four different possibilities for taking a picture:

  • Software – Via code running on a host computer sending commands to the COM port where the arduino is attached
  • Arduino – Via code running on the arduino itself (not implemented at the moment)
  • IR remote – Via an arbitrary IR remote control
  • Cable – Via an attached remote release cable

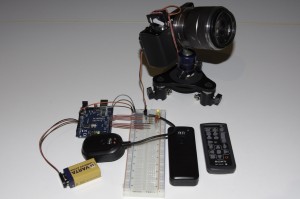
The following image shows the finished breadboard version. You see the arduino board in blue on the left above the yellow 9V battery. Between the arduino board and the battery is the attached wireless remote receiver. In the middle you find the white breadboard with the necessary electronics. On the NEX you see the servo attached via a cable strap and a rubber band. On the right you see the wireless remote transmitter and the IR remote transmitter.

Ultimate Trigger V1 - Overview

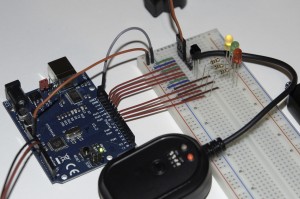
This image shows the breadboard in detail: On the breadboard you find from top to bottom:

  1. The attached servo (a JR type model with brown, red and orange cables)
  2. The attached wireless receiver. This could also be any other type of Minolta, Konica-Minolta or Sony remote cable release. The receiver is a third party RF wireless type.
  3. The IR receiver able to receive most types of consumer IR remote controls.
  4. Three status LEDs with the necessary series resistors.
Ultimate Trigger V1 - Details

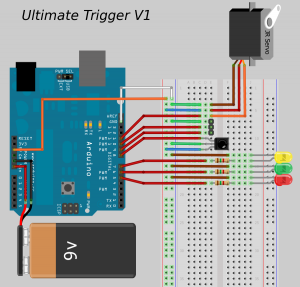
This image shows the breadboard design in detail. It has been made with Fritzing.

Ultimate Trigger V1 - Breadboard

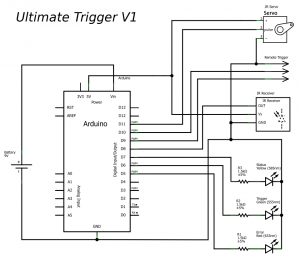
This image shows the schematics of the electronics (also made with Fritzing).

Ultimate Trigger V1 - Schematic

The following code for the arduino sketch makes use of two libraries: Servo (included in the arduino IDE) and IRremote!

/*
 * Ultimate Trigger V1
 * by Markus Matern aka PanoTwin Markus
 * 
 * Release: 20120107
 * 
 * This code is licensed under the Creative Commons Attribution-ShareAlike 3.0 Unported License.
 * To view a copy of this license, visit http://creativecommons.org/licenses/by-sa/3.0/
 * or send a letter to:
 * Creative Commons, 171 Second Street, Suite 300, San Francisco, California, 94105, USA.
 */
 
#include <Servo.h>
#include <IRremote.h>
 
// Servo configuration
const int servoPin = 11;
const int minimumAngle = 0;
const int maximumAngle = 179;
const int zeroAngle = 100;
const int wakeUpAngle = 107;
const int shootAngle = 110;
Servo myservo;
 
// Wireless remote configuration
const int triggerWhite = 10;
const int triggerBlue = 9;
int whiteVal = LOW;
int blueVal = LOW;
 
// IR receiver configuration
int RECV_PIN = 8;
IRrecv irrecv(RECV_PIN);
decode_results results;
 
// Diagonstic configuration
const int ledStatus = 7;
const int ledTrigger = 6;
const int ledError = 5;
 
void setup() {
  // Diagnostic setup
  pinMode(ledStatus, OUTPUT);
  digitalWrite(ledStatus, HIGH);
  pinMode(ledTrigger, OUTPUT);
  digitalWrite(ledTrigger, LOW);
  pinMode(ledError, OUTPUT);
  digitalWrite(ledError, LOW);
 
  // Servo setup
  myservo.attach(servoPin);
  myservo.write(zeroAngle);
 
  // Wireless setup
  pinMode(triggerWhite, INPUT);
  // make sure the input pin is not undefined
  digitalWrite(triggerWhite, HIGH);
  pinMode(triggerBlue, INPUT);
  // make sure the input pin is not undefined
  digitalWrite(triggerBlue, HIGH);
 
  // IR receiver setup
  irrecv.enableIRIn(); // Start the receiver
 
  // Serial setup
  Serial.begin(9600);
}
 
void shoot(){
  StatusTrigger(1);
  myservo.write(wakeUpAngle);
  delay(1000);
  myservo.write(shootAngle);
  delay(1000);
  myservo.write(zeroAngle);
  StatusTrigger(0);
  delay(1000);
}
 
void wakeUp(){
  StatusTrigger(1);
  myservo.write(wakeUpAngle);
  delay(1000);
  myservo.write(zeroAngle);
  StatusTrigger(0);
  delay(1000);
}
 
void minAngle(){
  StatusTrigger(1);
  myservo.write(minimumAngle);
  delay(1000);
  myservo.write(zeroAngle);
  delay(1000);
  StatusTrigger(0);
}
 
void maxAngle(){
  StatusTrigger(1);
  myservo.write(maximumAngle);
  delay(1000);
  myservo.write(zeroAngle);
  delay(1000);
  StatusTrigger(0);
}
 
void Blink(int blinkLed,
           int milliseconds,
           int blinkCount)
{
  for(int i = 0; i < blinkCount; i++)   {
      Status(blinkLed, 1);
      delay(milliseconds/blinkCount/2);
      Status(blinkLed, 0);
      delay(milliseconds/blinkCount/2);
    }
  }
  void BlinkBeforeTrigger(int milliseconds) {
    Blink(ledTrigger, milliseconds, 3);
  }
  void StatusTrigger(int newStatus) {
    Status(ledTrigger, newStatus);
  }
  void StatusError(int newStatus) {
    Status(ledError, newStatus);
  }
  void Status(int pin, int newStatus) {
    if(newStatus){
      digitalWrite(pin, HIGH);
    } else {
      digitalWrite(pin, LOW);
    }
  }
  void loop() {
    // remote control via serial communication
    if (Serial.available() > 0) {
    int b = Serial.read();
    switch(b) {
      case 't':
        shoot();
        break;
      case 'w':
        wakeUp();
        break;
      case '0':
        minAngle();
        break;
      case '8':
        maxAngle();
        break;
      default:
        Blink(ledError, 600, 3);
        break;
    }
    Serial.flush();
  } else if (irrecv.decode(&results)) {
    switch(results.value)
    {
      // Sony Shutter (2 Sec)
      case 0xECB8F:
        StatusTrigger(1);
        Blink(ledTrigger, 2000, 4);
      // Note: No break here!
      // fall through to shoot!
      // Sony Shutter
      case 0xB4B8F:
        shoot();
        break;
      case 0:
        break;
      default:
        StatusError(1);
        Serial.println(results.value, HEX);
        Blink(ledError, 600, 3);
        StatusError(0);
        break;
    }
    // Receive the next value
    irrecv.resume();
  } else {
    // Check the wireless remote trigger
    int newWhiteVal = digitalRead(triggerWhite);
    int newBlueVal = digitalRead(triggerBlue);
 
    if (newWhiteVal != whiteVal) {
      if (newWhiteVal == HIGH) {
        //Serial.println("White High");
        myservo.write(zeroAngle);
        StatusTrigger(0);
      } else {
        //Serial.println("White Low");
        StatusTrigger(1);
        StatusError(0);
        myservo.write(wakeUpAngle);
      }
      whiteVal = newWhiteVal;
    }
    if (newBlueVal != blueVal) {
      if (newBlueVal == HIGH) {
        //Serial.println("Blue High");
        StatusError(0);
      } else {
        //Serial.println("Blue Low");
        myservo.write(shootAngle);
        StatusTrigger(1);
        StatusError(1);
      }
      blueVal = newBlueVal;
    }
  }
}
QR Code Business Card